Installation and Getting Started
On this page, we will take you through the process of setting up PolicyKit, both for local development and on an Ubuntu server.
Local Development
PolicyKit requires Python 3. Our guide recommends that you manage the repository with a Python 3+ virtual environment.
To begin, clone the PolicyKit GitHub repository (or your fork) and navigate to the repo directory:
git clone https://github.com/policykit/policykit.git
cd policykit
Install Python3, create a virtual environment for Policykit, and ensure your environment is using the latest version of pip:
sudo apt install python3-pip python-venv
python3 -m venv policykit_venv
source policykit_venv/bin/activate
pip install --upgrade pip
Your terminal prompt should change to look something like this (policykit_venv)user@host:/path/to/directory/policykit$ after activating the virtual environment.
Navigate to the project’s root directory and install PolicyKit’s dependencies:
cd policykit
pip install -r requirements.txt
Next, run the following commands to create an
.envfile to store your settings and secrets:
cd policykit
cp .env.example .env
To run PolicyKit in production, you’ll need to change some values in the .env file such as the DJANGO_SECRET_KEY and SERVER_URL.
For local development, all you need to do is set DEBUG=true.
Navigate up a directory and run the following command to create and set up the database:
cd ..
python3 manage.py migrate
By default, PolicyKit will create a sqlite3 database in the project’s root directory. If you want to use another database, or if you want to change the database path, you can edit the DATABASES field in settings.py. Documentation for editing this field can be found in the Django docs.
Verify that you have setup the PolicyKit server correctly:
python3 manage.py runserver
Open PolicyKit in the browser at http://localhost:8000/main. At this point, you won’t be able to log in because PolicyKit currently only supports sign-in via external auth providers (Slack, Discord, Reddit, and Discourse).
There is an open issue to support logging in without any third-party platform: #514.
To log in to PolicyKit, you’ll need to install it on a server and set up at least 1 of the auth-enabled integrations.
Running PolicyKit on a Server
Thus far, we have run Policykit in Ubuntu 18.04 and Ubuntu 20.04. The instructions below should work for both.
Add PolicyKit to the server by uploading the codebase or using
git clonein/var/www/or your directory of choice. This guide will assume that PolicyKit has been added to/var/www/.git clone https://github.com/policykit/policykit.git cd policykitInstall Python3, create a virtual environment for PolicyKit, and ensure your environment is using the latest version of pip:
sudo apt install python3-pip python3-venv
python3 -m venv policykit_venv
source policykit_venv/bin/activate
pip install --upgrade pip
Your terminal prompt should change to look something like this (policykit_venv)user@host:/var/www/policykit$ after activating the virtual environment.
Navigate to the project’s root directory and install PolicyKit’s dependencies:
cd policykit
pip install -r requirements.txt
Next, run the following commands to create an
.envfile to store your settings and secrets:cd policykit cp .env.example .envGenerate a secret key for Django using this command:
cd ..
python3 manage.py shell -c 'from django.core.management import utils; print(utils.get_random_secret_key())'
cd policykit
Make the following changes to
.env:Set the
DJANGO_SECRET_KEYfield. Add the key that was generated in the last stepSet the
SERVER_URLfield.Set the
ALLOWED_HOSTSfield to point to your host.Make sure
DEBUGis empty or set to false.Optional, if following the file system architecture used in this guide: set the
LOG_FILEfield to/var/log/django/policykit/debug.logBe sure to uncomment these fields by removing the
#at the start of a line.You can leave the platform integration API keys/secrets empty for now. Follow the instructions below under Set up Integrations to set up each integration.
Navigate up a directory and run the following command to create and set up the database:
cd ..
python3 manage.py migrate
By default, PolicyKit will create a sqlite3 database in the root directory. If you want to use another database, or if you want to change the database path, you can edit the DATABASES field in settings.py. Documentation for editing this field can be found in the Django docs.
Next, run the following command to collect static files into a
static/folder:python3 manage.py collectstatic
Deploy with Apache web server
Now that you have PolicyKit installed on your server, you can deploy it on Apache web server.
Make sure you have a domain dedicated to Policykit that is pointing to your server’s IP address.
Note
In the remaining examples in this section, make sure to substitute the following values used in the Apache config files with an absolute path:
$POLICYKIT_REPO is the path to your policykit repository root. (i.e. /var/www/policykit)
$POLICYKIT_ENV is the path to your policykit virtual environment. (i.e.``/var/www/policykit/policykit_venv``)
$SERVER_NAME is your server name. (i.e. policykit.mysite.com)
Install apache2 and the apache module Web Server Gateway Interface:
sudo apt-get install apache2 libapache2-mod-wsgi-py3
Create a new apache2 config file:
cd /etc/apache2/sites-available
# replace SERVER_NAME (i.e. policykit.mysite.com.conf)
cp default-ssl.conf SERVER_NAME.conf
Edit the config file to look like this:
<IfModule mod_ssl.c>
        <VirtualHost _default_:443>
                ServerName $SERVER_NAME
                ServerAdmin webmaster@localhost
                Alias /static $POLICYKIT_REPO/policykit/static
                DocumentRoot $POLICYKIT_REPO

                # Grant access to the static site
                <Directory $POLICYKIT_REPO/policykit/static>
                        Require all granted
                </Directory>

                # Grant access to wsgi.py file. This is the Django server.
                <Directory $POLICYKIT_REPO/policykit/policykit>
                        <Files wsgi.py>
                                Require all granted
                        </Files>
                </Directory>

                # Setup the WSGI Daemon
                WSGIDaemonProcess policykit python-home=$POLICYKIT_ENV python-path=$POLICYKIT_REPO/policykit
                WSGIProcessGroup policykit
                WSGIScriptAlias / $POLICYKIT_REPO/policykit/policykit/wsgi.py
                # .. REST ELIDED
        </VirtualHost>
</IfModule>
Test your config with
apache2ctl configtest. You should get “Syntax OK” as a response.Enable your site:
# activate your config
a2ensite /etc/apache2/sites-available/$SERVER_NAME.conf

# disable the default ssl config
sudo a2dissite default-ssl.conf
Get an SSL certificate and set it up to auto-renew using LetsEncrypt:
sudo apt install certbot python3-certbot-apache
sudo certbot --apache
Add the certificates to your
$SERVER_NAME.conffile (certbot may auto-inject this code at the bottom of your .conf):SSLCertificateFile /etc/letsencrypt/live/$SERVER_NAME/fullchain.pem SSLCertificateKeyFile /etc/letsencrypt/live/$SERVER_NAME/privkey.pem
Reload the config:
systemctl reload apache2
Give the Apache2 user (aka
www-data) access to the Django log directory and the database directory. Update paths as needed based on personal setup:sudo chown -R www-data:www-data /var/log/django/policykit/ sudo chown -R www-data:www-data /var/databases/policykit/
Load your site in the browser and navigate to
/login. You should see a site titled “PolicKiy Administration” with options to connect to Slack, Discourse, and Discord. Before you can install PolicyKit into any of these platforms, you’ll need to set the necessary Client IDs and Client Secrets in.env. Follow the setup instructions for these and other integrations in Integrations.
Check for errors at
/var/log/apache2/error.logand/var/log/django/policykit/debug.log(or whatever logging path you set in.env).
Any time you update the code, you’ll need to run
systemctl reload apache2to reload the server.
Set up Celery
PolicyKit uses Celery to run scheduled tasks. Follow these instructions to run a celery daemon on your Ubuntu machine using systemd. For more information about configuration options, see Celery Daemonization.
Create celery user
If you don’t already have a celery user, create one:
sudo useradd celery -d /home/celery -b /bin/bash
Give the celery user access to necessary pid and log folders:
sudo useradd celery -d /home/celery -b /bin/bash
sudo mkdir /var/log/celery
sudo chown -R celery:celery /var/log/celery
sudo chmod -R 755 /var/log/celery

sudo mkdir /var/run/celery
sudo chown -R celery:celery /var/run/celery
sudo chmod -R 755 /var/run/celery
The celery user will also need write access to the Django log file and the database. To give celery access, create a group that contains both www-data (the apache2 user) and celery. For example, if your Django logs are in /var/log/django and your database is in /var/databases:
sudo groupadd www-and-celery
sudo usermod -a -G www-and-celery celery
sudo usermod -a -G www-and-celery www-data

# give the group read-write access to logs
sudo chgrp -R www-and-celery /var/log/django/policykit
sudo chmod -R 775 /var/log/django/policykit

# give the group read-write access to database (if using sqlite)
sudo chgrp -R www-and-celery /var/databases/policykit
sudo chmod -R 775 /var/databases/policykit
Create Celery configuration files
Next, you’ll need to create three Celery configuration files for PolicyKit
Note
Remember to substitute the following variables with an absolute path:
$POLICYKIT_ENV is the path to your policykit virtual environment. (i.e. /var/www/policykit/policykit_venv)
$POLICYKIT_REPO is the path to your policykit repository root. (i.e. /var/www/policykit)
/etc/conf.d/celery
CELERYD_NODES="w1"

# Absolute or relative path to the 'celery' command:
CELERY_BIN="$POLICYKIT_ENV/bin/celery"

# App instance to use
CELERY_APP="policykit"

# How to call manage.py
CELERYD_MULTI="multi"

# Extra command-line arguments to the worker
CELERYD_OPTS="--time-limit=300 --concurrency=8"

# - %n will be replaced with the first part of the nodename.
# - %I will be replaced with the current child process index
#   and is important when using the prefork pool to avoid race conditions.
CELERYD_PID_FILE="/var/run/celery/%n.pid"
CELERYD_LOG_FILE="/var/log/celery/%n%I.log"
CELERYD_LOG_LEVEL="INFO"

# you may wish to add these options for Celery Beat
CELERYBEAT_PID_FILE="/var/run/celery/beat.pid"
CELERYBEAT_LOG_FILE="/var/log/celery/beat.log"
/etc/systemd/system/celery.service
[Unit]
Description=Celery Service
After=network.target

[Service]
Type=forking
User=celery
Group=celery
EnvironmentFile=/etc/conf.d/celery
WorkingDirectory=$POLICYKIT_REPO/policykit
ExecStart=/bin/sh -c '${CELERY_BIN} multi start ${CELERYD_NODES} \
-A ${CELERY_APP} --pidfile=${CELERYD_PID_FILE} \
--logfile=${CELERYD_LOG_FILE} --loglevel=${CELERYD_LOG_LEVEL} ${CELERYD_OPTS}'
ExecStop=/bin/sh -c '${CELERY_BIN} multi stopwait ${CELERYD_NODES} \
--pidfile=${CELERYD_PID_FILE}'
ExecReload=/bin/sh -c '${CELERY_BIN} multi restart ${CELERYD_NODES} \
-A ${CELERY_APP} --pidfile=${CELERYD_PID_FILE} \
--logfile=${CELERYD_LOG_FILE} --loglevel=${CELERYD_LOG_LEVEL} ${CELERYD_OPTS}'

[Install]
WantedBy=multi-user.target
/etc/systemd/system/celerybeat.service
[Unit]
Description=Celery Beat Service
After=network.target

[Service]
Type=simple
User=celery
Group=celery
EnvironmentFile=/etc/conf.d/celery
WorkingDirectory=$POLICYKIT_REPO/policykit
ExecStart=/bin/sh -c '${CELERY_BIN} -A ${CELERY_APP}  \
beat --pidfile=${CELERYBEAT_PID_FILE} \
--logfile=${CELERYBEAT_LOG_FILE} --loglevel=${CELERYD_LOG_LEVEL} \
--schedule=/var/run/celery/celerybeat-schedule'

[Install]
WantedBy=multi-user.target
After creating the files (and after any time you change them) run the following command:
sudo systemctl daemon-reload
Next, install RabbitMQ, a message broker:
sudo apt-get install erlang rabbitmq-server
Enable and start the RabbitMQ service:
sudo systemctl enable rabbitmq-server
sudo service rabbitmq-server start
Check the status to make sure everything is running smoothly:
systemctl status rabbitmq-server
Finally, run the following commands to start the celery daemon:
sudo systemctl start celery celerybeat
Verify that there are no errors with celery and celerybeat by running these commands:
sudo systemctl status celery
sudo systemctl status celerybeat
Troubleshooting
If celery or celerybeat fail to start up as a service, try running celery directly to see if there are errors in your code:
celery -A policykit worker -l info --uid celery
celery -A policykit beat -l info --uid celery --schedule=/var/run/celery/celerybeat-schedule
If celerybeat experiences errors starting up, check the logs at /var/log/celery/beat.log.
Interactive Django Shell
The interactive Django shell can be useful when developing and debugging PolicyKit. Access the Django shell with python manage.py shell_plus. Some useful shell commands for development:
# List all communities
Community.objects.all()

# List CommunityPlatforms for a specific community
community = Community.objects.first()
CommunityPlatform.objects.filter(community=community)

# Get all pending proposals
Proposal.objects.filter(status="proposed")

# Manually run the policy checking task that is executed on a schedule by Celery
from policyengine.tasks import evaluate_pending_proposals
evaluate_pending_proposals()

###### Advanced Commands for debugging Metagov ######

# Access the Metagov Community model
from metagov.core.models import Community as MetagovCommunity
MetagovCommunity.objects.all()
MetagovCommunity.objects.get(slug=community.metagov_slug)

# Access the Metagov Plugin models (1:1 with CommunityPlatform)
Plugin.objects.all()
Slack.objects.all()
Plugin.objects.filter(community__slug=community.metagov_slug)

# Get pending Metagov GovernanceProcesses
GovernanceProcess.objects.filter(status='pending')
GovernanceProcess.objects.filter(plugin__community=metagov_community)
SlackEmojiVote.objects.filter(status='pending', plugin__community__slug="my-slug")
Set up Integrations
Before your instance of PolicyKit can be installed onto external platforms, you’ll need to go through setup steps for each integration that you want to support.
See the Integrations page for a list of PolicyKit capabilities supported by each platform integration.
Slack
The Slack integration is facilitated through the Metagov plugin.
Slack requires an initial setup process to create bots/apps and allow the developer to store Slack Client IDs and Secrets on the PolicyKit server.
Begin by creating a new app.
Creating a New App
Visit https://api.slack.com/apps and click the “Create New App” button, and then select the “From scratch” option.
Give your app a name and pick a workspace to develop your app in.
You must be the admin of the workspace to add a new app. If you are not an admin of any current workspace you can create a new workspace.
Go to the “Basic Information” page and under “Building Apps for Slack”, expand the “Add features and functionality section”. We will work our way through each subsection detailing how to configure your application.
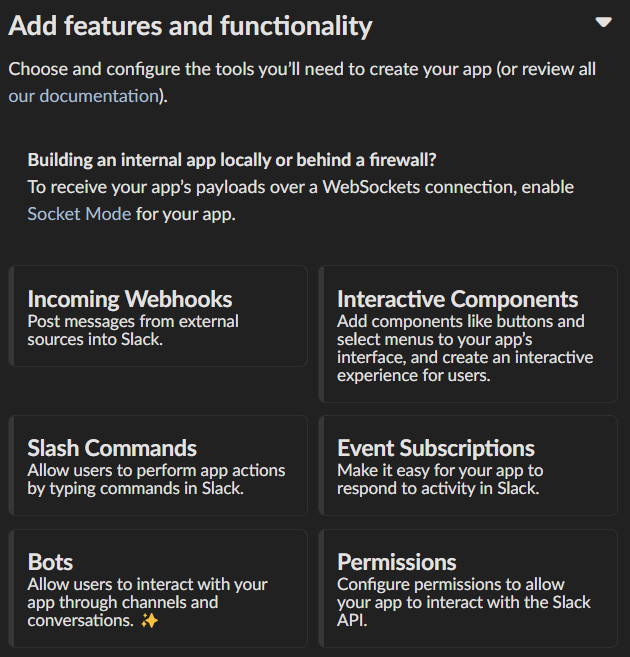
Incoming Webhooks
Activate the toggle from off to on in this section.
Interactive Components
Activate the toggle from off to on in this section.
Enter the following URL in the Request URL box (changing $SERVER_NAME for the server url you setup above): https://$SERVER_NAME/api/hooks/slack
Slash Commands
No changes needed.
Event Subscriptions
Activate the toggle from off to on in this section.
Enter the following URL in the Request URL box (changing $SERVER_NAME for the server url you setup above): https://$SERVER_NAME/api/hooks/slack
Bots
Activate the toggle from off to on for Always Show My Bot as Online.
Permissions
Enter the following URL in the Redirected URLs bot in the Redirect URLs section (changing $SERVER_NAME for the server url you setup above): https://$SERVER_NAME/auth/slack/callback
We recommend adding the following scopes to your app for testing PolicyKit with Slack. Remove unnecessary scopes after testing:
Bot Token Scopes
app_mentions:readchannels:historychannels:joinchannels:managechannels:readchat:writechat:write.customizechat:write.publiccommandsdnd:reademoji:readfiles:readgroups:readgroups:writeim:historyim:readim:writeincoming-webhooklinks:readlinks:writempim:historympim:readmpim:writepins:readpins:writereactions:readreactions:writeteam:readusergroups:readusergroups:writeusers.profile:readusers:readusers:read.emailusers:write
User Token Scopes
chat:writereactions:read
Install Your App
After defining scopes you are able to install your app to your Slack workspace to test it and generate API tokens.
Go back to the “Basic Information” page and expand the “Install your App section”. Then click “Install to Workspace”.
Setting Your .env
Under the “Basic Information” section are your app credentials, including the App ID, Client ID, Client Secret, and Signing Secret.
Add these values to your .env in $POLICY_REPO/policykit/policykit/.env
Reload the Apache server
systemctl reload apache2
Connecting PolicyKit to Your Slack App
You can now visit your PolicyKit login page $SERVER_NAME/login and “Install Policykit to Slack”.
You will be prompted to authorize the the app to access your workspace.
After authorizing, you will be presented with three options for governance systems to start with:
Testing
Dictator
Moderators
For more information on how to manage policies in PolicyKit see Design Overview and Writing Policies
Production Considerations and Public Distribution
If you plan to allow other Slack workspaces to use your PolicyKit server, you will need to change your Slack app from private to public distribution. Slack has a guide for distributing your app publicly.
Discord
The Discord integration occurs through Metagov. Instructions for how to setup the plugin for Metagov Discord to be written.
Discourse
There is no admin setup required for Discourse. Each Discourse community that installs PolicyKit needs to register the PolicyKit auth redirect separately.
Reddit
Create a new app at https://www.reddit.com/prefs/apps
Set the
REDDIT_CLIENT_SECRETinprivate.py.Reload apache2:
systemctl reload apache2
Developing the Metagov Gateway
If you’re making changes to the Metagov Gateway and want to test those changes in PolicyKit, you have two options:
Push your changes to a branch or fork, and update
requirements.txtin PolicyKit to point to it:-e git+https://github.com/metagov/gateway.git@<your-dev-branch>#egg=metagov&subdirectory=metagov
Use pip “editable” installs to point to your local Metagov Gateway codebase:
pip install -e /path/to/gateway/repo/metagov